I’m trying to pass a physical serial (COM) port from my Windows host into a VirtualBox guest so I can use legacy hardware tools that only run in the VM. I’ve enabled the serial port in the VM settings and mapped it to the host COM port, but the guest OS either can’t see the port or it randomly disconnects during use. I need a stable setup for debugging embedded devices and flashing firmware through the VM. Has anyone found a reliable configuration, workaround, or specific VirtualBox version/settings that make hardware serial port passthrough work consistently?
This bites a lot of people in VirtualBox, because “serial port enabled” in the settings doesn’t automatically mean “works reliably with real hardware.”
Here’s a breakdown of what usually works best when you want a Windows host COM port inside a VirtualBox guest:
-
Use Host Device mode correctly
In VM settings- Go to Settings → Serial Ports.
- Check “Enable Serial Port.”
- Port Number: COM1 (or whatever the guest expects).
- Port Mode: Host Device.
- Port/File Path on a Windows host must be exactly like:
COM1toCOM9: just typeCOM1COM10and above: you must type\\.\COM10etc.
A ton of people forget the\\.\prefix for high‑numbered COM ports and then wonder why the VM cannot open it.
-
Make sure nothing else is grabbing the port
Only one process can own a physical COM port at a time.- Close any terminal apps on the host: PuTTY, TeraTerm, Arduino IDE, vendor config tools, etc.
- Check in Device Manager that the port is not showing errors.
- Disable any “serial modem” or “diagnostic” software that likes to sit on the port.
-
Match settings in guest and hardware
Inside the guest OS, use the exact same parameters your hardware expects:- Baud rate, parity, data bits, stop bits, flow control.
The virtualization layer does not magically fix mismatched settings. If it worked on bare metal with 9600 8N1 and no flow control, make the guest app use the same.
- Baud rate, parity, data bits, stop bits, flow control.
-
Try I/O APIC and base I/O settings if using old OS / legacy tools
Some old DOS or very old Windows tools hard‑code COM1 at 0x3F8 / IRQ 4.- In Serial Port settings, leave I/O Port at
0x3F8and IRQ at4for COM1. - If you added multiple ports, make sure they don’t overlap and line up with what the old software expects.
- In Serial Port settings, leave I/O Port at
-
USB‑to‑Serial adapters complicate things
If your “physical” COM port is actually a USB adapter:- Option A: Continue to map it via Host Device (
COMx/\\.\COMx). Usually works but is sometimes flaky. - Option B: Do not map it as COM at all. Instead, pass the USB device directly to the VM (Devices → USB → select your adapter). Then install its Windows/Linux drivers inside the guest.
For some finicky hardware tools, USB passthrough is more reliable than exposing the host COM interface.
- Option A: Continue to map it via Host Device (
-
Run VirtualBox with admin rights
On some locked‑down Windows setups, VirtualBox cannot open hardware ports unless it has proper privileges.- Try running VirtualBox as Administrator.
- Check that your user is in the “vboxusers”‑type group on other platforms.
-
Consider a network‑based serial bridge for rock‑solid access
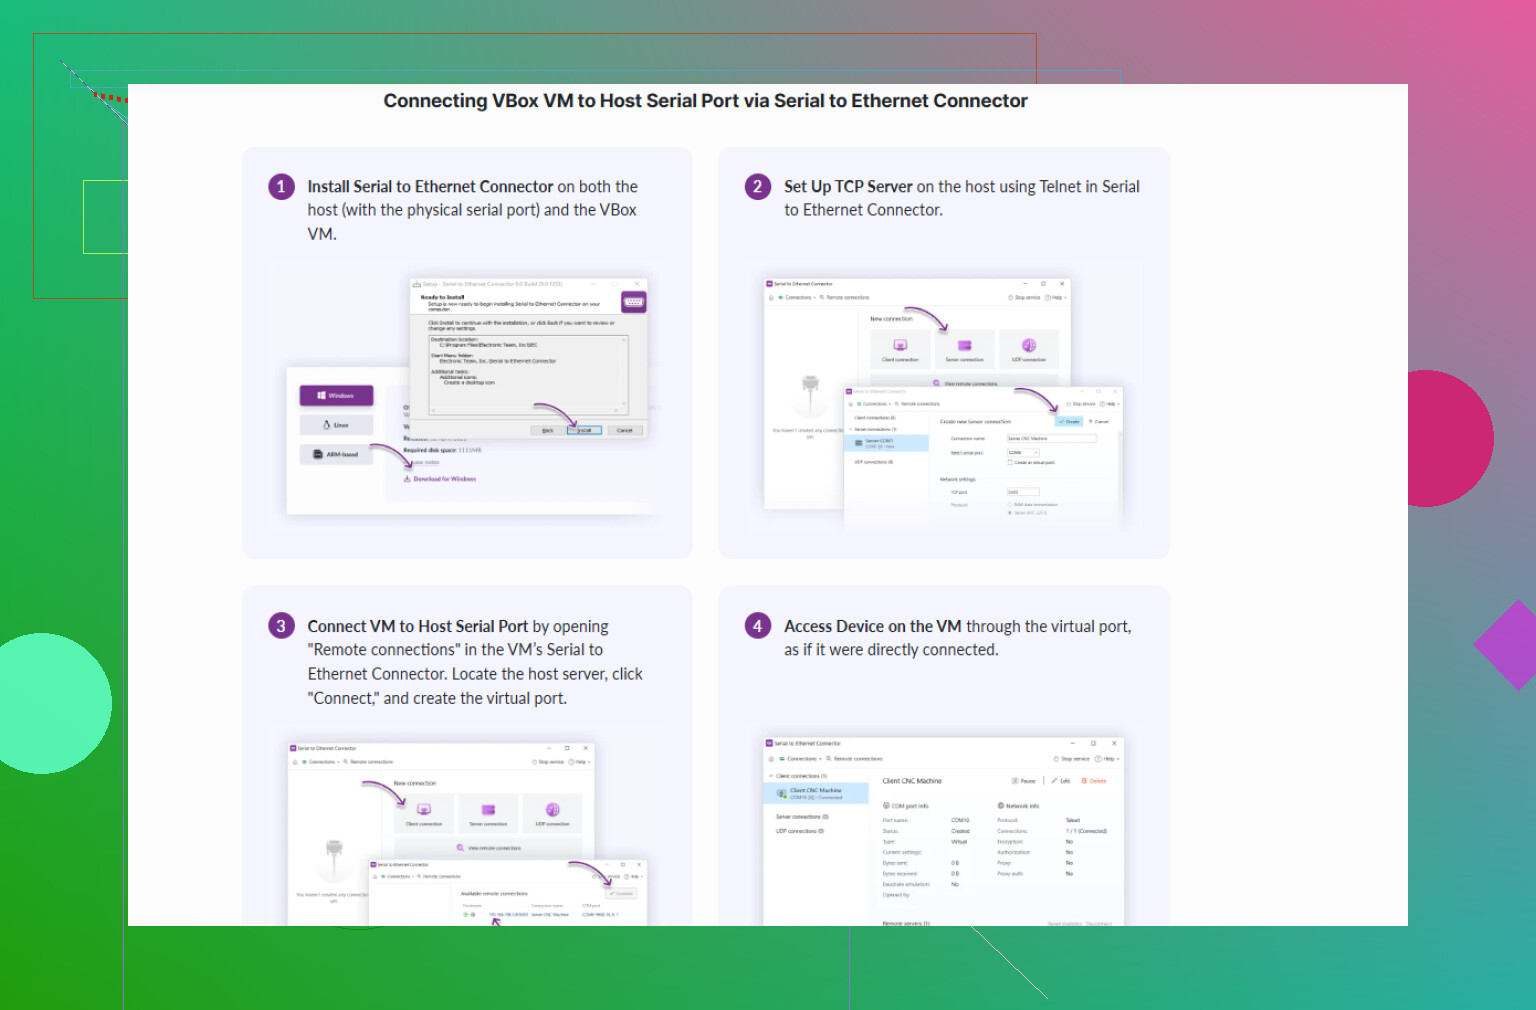
If you keep fighting with “port is busy” or random disconnects, using a software serial redirector is usually more robust.- Install Serial to Ethernet Connector on the host.
- It creates a virtual serial interface in the guest that forwards traffic over TCP/IP to the physical COM port on the host.
- This decouples VirtualBox from the actual hardware access and tends to be way more stable, especially when you move VMs between machines or have multiple users.
For a cleaner walkthrough on getting a VirtualBox guest talking to a real COM interface, check out practical ways to use a serial port in VirtualBox VMs. It covers classic “VirtualBox serial port” headaches in a more step‑by‑step way than Oracle’s docs.
-
Quick sanity tests
- On the host, use PuTTY or another terminal and verify the port can talk to your hardware directly.
- Shut that program down.
- Start the VM and use a serial terminal inside the guest.
- If that fails, try swapping to another COM number on the host or simplifying the chain (no USB hubs, shorter cable, different adapter).
If you’re already doing all of that and it still drops or acts weird, I’d honestly stop wrestling with native COM passthrough and go straight to a networked approach with Serial to Ethernet Connector. VirtualBox’s serial passthrough works, but it is definitely not the most forgiving thing when you mix USB adapters, legacy apps, and modern Windows hosts.
10 Likes
Couple of things to add on top of what @viajantedoceu already covered, since VirtualBox serial passthrough is… temperamental, to put it nicely.
-
Don’t trust “it’s enabled” in the GUI
VirtualBox can say the port is enabled and still silently fail to actually pass traffic. In the guest, check if the port is really alive:- On Windows guest: Device Manager → Ports. If you don’t see COM1/COM2 there, your app is already doomed.
- On Linux guest:
dmesg | grep ttySandsetserial -g /dev/ttyS*.
If the guest OS doesn’t see the UART at all, no legacy tool will fix that.
-
Avoid sharing the same COM number inside the guest and host when testing
This is where I slightly disagree with the usual advice. Mapping host COM3 to guest COM3 sounds clean, but it can make troubleshooting harder. Use:- Host: COM3
- Guest: expose as COM1 (0x3F8 / IRQ 4 in VirtualBox)
Then in the guest app, explicitly choose COM1. That way you know you’re really talking through the virtualized interface and not some confused driver mapping.
-
Turn off “fancy” power management on the host
Windows loves to put USB and serial stuff to sleep:- Device Manager → your USB‑to‑serial adapter → Power Management → uncheck “Allow the computer to turn off this device to save power.”
- Same for USB root hubs.
I’ve had perfectly working setups that randomly died after 10–15 minutes because Windows parked the adapter.
-
Watch out for latency and timing‑sensitive legacy tools
Some really old hardware tools assume bare‑metal timing. Under virtualization you still get the bytes right, but timing can be jittery enough that:- Autobaud fails
- Reset/bootload sequences don’t get detected
- Programmer tools time out on handshake
To test this, try a dumb serial terminal in the guest first. If “human typing” works but the vendor tool fails, you’re likely hitting timing quirks, not a pure COM config problem.
-
Prefer raw access over “smart” host drivers when possible
If your hardware came with a special Windows driver on the host that does weird buffering, filtering or firmware updates over the same COM channel, that can conflict with VirtualBox. Uninstall or disable that stuff on the host and let the guest own the protocol stack when you can. -
Consider skipping VirtualBox serial passthrough entirely
When you want real reliability instead of spending all day chasing ghosts, a network bridge is often cleaner. This is where Serial to Ethernet Connector shines:- Install it on the Windows host.
- Bind it to the real COM port (including USB‑to‑serial).
- It exposes that port over TCP/IP.
- In the guest, you connect to that TCP endpoint and use a virtual serial port inside the VM.
This avoids the “VirtualBox grabs my COM and drops it randomly” problem and also makes it easier to move the VM to another machine later; you just point it at a new IP.
If you go this route, grab it from something like
get Serial to Ethernet Connector for stable COM over network
That’s a lot more robust if you’re dealing with finicky legacy hardware tools. -
Basic sanity checklist I use before blaming VirtualBox
- Hardware works directly on host with a terminal program.
- Same cable, same port, no hubs if possible.
- No other host software has the port open.
- Guest OS sees a serial port and no yellow exclamation marks.
- Simple echo test in guest (loopback plug or device that echoes chars).
Only after that passes do I even start debugging the actual legacy tool.
If you post what exact OS is in the guest, what adapter you’re using (real RS‑232 vs USB‑serial), and whether the tool is DOS / Win9x / newer, it’s easier to guess where the weak link is. Right now, I’d honestly put my money on either power management on the host or timing‑sensitive software that really wants a cleaner serial path like the Serial to Ethernet Connector setup.
A couple of angles that weren’t really covered yet:
-
Try “Disconnected, then attach” workflow
VirtualBox sometimes behaves better if the serial port is not connected at VM boot.- In Serial Port settings, keep it enabled but uncheck “Connected.”
- Boot the guest, wait for the OS to be fully up.
- Then go to Devices → Serial Ports → connect the port.
This avoids some BIOS / early‑boot probing issues that make legacy tools grumpy.
-
Test with a loopback plug, not your real device
Before blaming VirtualBox or your legacy tool, isolate things:- Put a loopback on the hardware port (short TX to RX on RS‑232 or jumper pins on the adapter).
- Inside the guest, open a terminal, type characters, and see if they echo back.
If the echo is clean and never drops, the VM path is usually fine and your issue is more protocol / timing than raw COM reliability.
-
Force fixed FIFO / buffer sizes in the guest
On Windows guests, some drivers expose advanced properties for COM buffering.- Device Manager → the VM’s COM port → Port Settings → Advanced.
- Reduce transmit and receive buffer sliders a bit, or even set them to minimum when dealing with extremely timing sensitive programmers.
This can reduce jitter that old tools interpret as “communication failure.”
On Linux, trysetserialwithlow_latencyand experiment with smallersttybuffer related flags.
-
Disable hardware flow control everywhere if the device does not use it
The others mentioned matching baud etc., but a specific pitfall:- If VirtualBox presents a 16550‑style UART and your guest or driver enables RTS/CTS, while the real device ignores those lines, you can get mysterious stalls.
In both host and guest tools, set flow control to “None” unless you are absolutely sure the device uses hardware handshaking.
- If VirtualBox presents a 16550‑style UART and your guest or driver enables RTS/CTS, while the real device ignores those lines, you can get mysterious stalls.
-
Be careful with nested “virtual” layers
If you are using a USB‑to‑serial adapter that already has some vendor “virtual COM” software on the host, then passing that as a COM device into the guest, your stack looks like:
Hardware → vendor driver → virtual COM on host → VirtualBox serial emulation → guest OS driver → legacy tool.
That chain is fragile. In that situation I often prefer:- Pass the USB adapter directly into the guest, or
- Use a network bridge and keep the serial logic either mostly in the host or mostly in the guest, but not split.
-
When network bridging makes more sense than native passthrough
I do not fully agree with treating VirtualBox passthrough as the default if you care about reliability. VirtualBox’s serial layer is fine for light, interactive use but for long running sessions, firmware flashing or production logging, a network based approach is usually calmer.This is where Serial to Ethernet Connector is worth a serious look, not as a magic fix, but as an architectural change:
Pros of Serial to Ethernet Connector
- Decouples the VM from the physical port, so if the VM crashes or you move it, the host still “owns” the hardware cleanly.
- Lets you expose a single physical COM port to different VMs over time without rewiring, just by changing IP / port settings.
- Often plays nicer with Windows host drivers, since they talk to a normal COM port and the software does the forwarding.
- Good fit if you might later want to access the same device from a different machine, not only that one VirtualBox host.
Cons of Serial to Ethernet Connector
- Adds one more software layer, which can introduce extra latency. For fast bootloaders or bit‑bang style protocols, you must test carefully.
- Requires configuration on both sides: host mapping plus virtual COM or TCP handling in the guest. Not as plug‑and‑play as ticking the “Enable serial port” box.
- Paid product, so not ideal if you are just doing a quick one‑off debug session.
- If your network is noisy or heavily filtered, you now depend on that stability as well.
Compared with what @chasseurdetoiles and @viajantedoceu suggested, this approach is less about fighting VirtualBox settings and more about sidestepping its serial implementation entirely.
-
For very old DOS / Win9x tools, consider real hardware timing
If your tool is from the era where people still cared about exact UART interrupt timing, no amount of tuning in VirtualBox will fully match bare metal. In those cases:- Try to slow the baud rate down. Many legacy devices tolerate 9600 or 19200 even if the docs show higher rates.
- If it is a programmer that toggles control lines in very strict sequences, you may need either a dedicated old PC or a more direct serial server approach where Serial to Ethernet Connector runs on a minimal host and your VM or modern system just opens a TCP socket to it.
In practice, I use this rule of thumb:
- For interactive consoles and simple config tools: VirtualBox host device mapping is fine if it passes the loopback test.
- For critical or long duration links: put the real COM under the control of the host and export it with something like Serial to Ethernet Connector, then let each VM treat it as a “remote but local‑enough” serial port.
Once you run the loopback tests and try smaller buffers / disabled flow control, you will have a much clearer idea whether you are hitting VirtualBox limitations or device / timing quirks. That determines whether you keep tuning passthrough or jump straight to the network bridge solution.