I accidentally deleted a bunch of important files from my Windows PC and I’m trying to figure out whether Disk Drill or Recuva is the better option to recover them. I care about recovery success rate, safety, and ease of use more than anything. Has anyone used both tools and can share which one worked better and why, especially for deep scans on a nearly full hard drive?
Hey all,
Last week my backup habits caught up with me. External drive started clicking, then stopped showing up during boot, and I realized I had family photos and some client stuff sitting on there with no second copy.
I went down the usual Google rabbit hole and kept seeing the same two names thrown around: Recuva because it’s free, and Disk Drill because it looks newer. I ended up installing both on a Windows laptop and spent a weekend messing with them on the same dying drive.
Here is what happened.
Recuva felt like going back in time
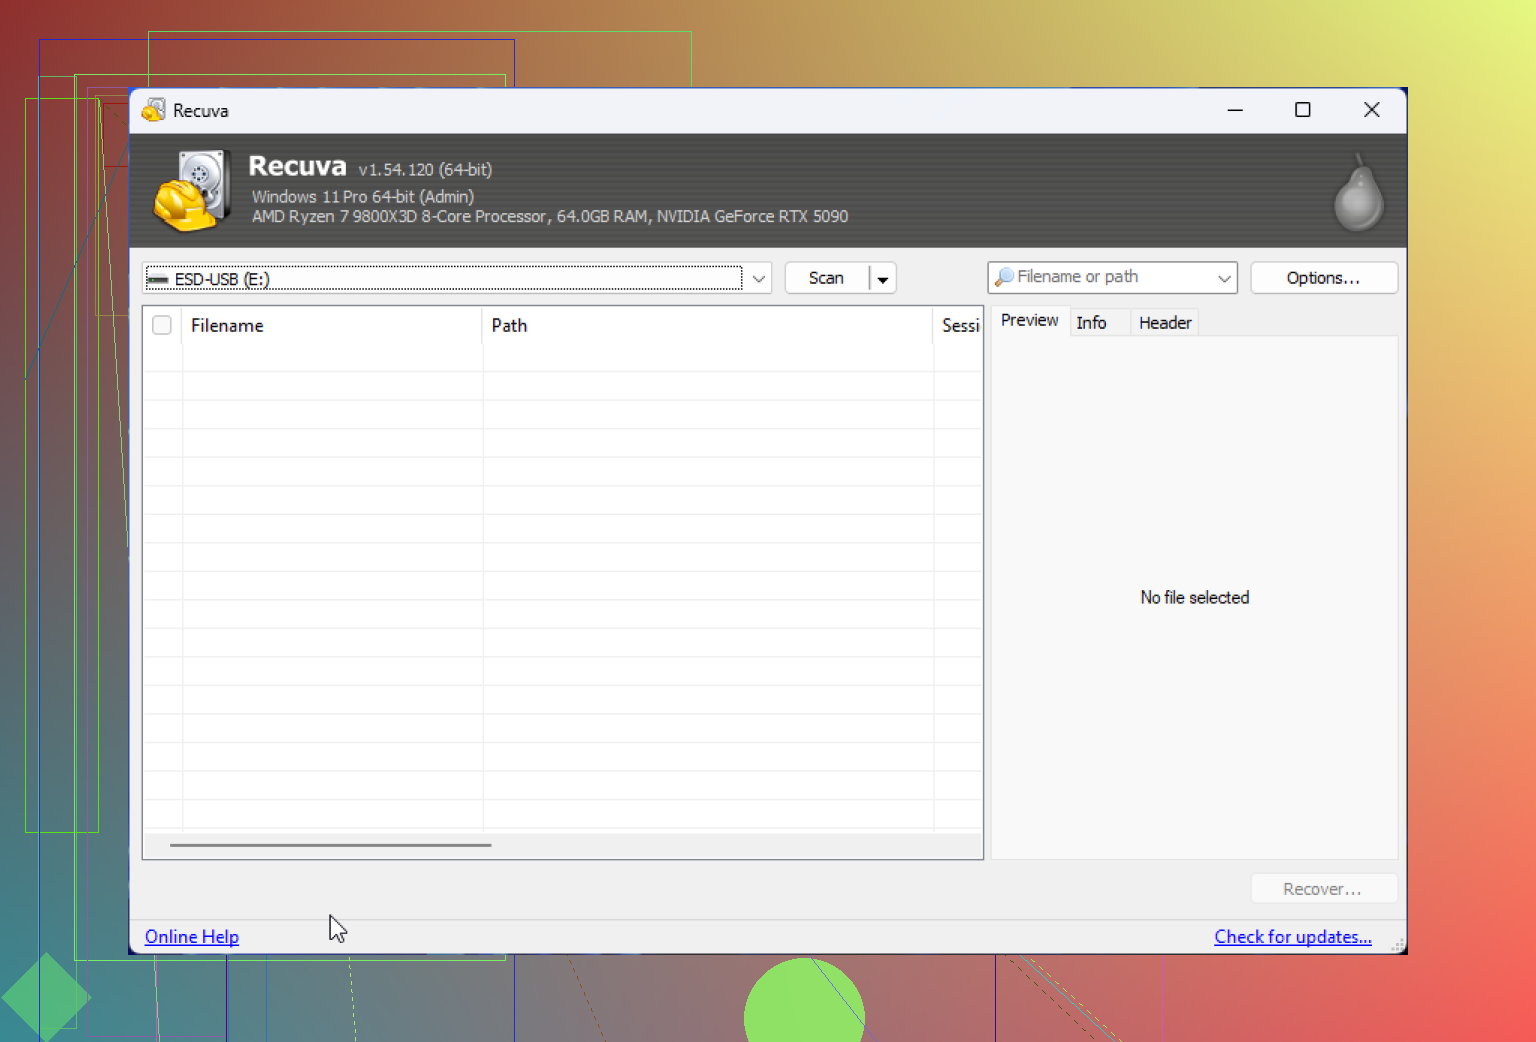
I grabbed Recuva first, since everyone on random threads keeps saying “use that, it’s free and good enough.”
The installer was fine, but the first launch felt odd. The UI looked like something from an old Windows tutorial. Not a dealbreaker, but it did not make me feel relaxed when the only copy of my kid’s birthday pictures depended on it.
The wizard asked where the lost files were. Stuff like:
- My Documents
- Recycle Bin
- On a media card
- In a specific location
This already slowed me down. My files started in a folder on the external HDD, then hit Recycle Bin at some point, then I emptied it. So which option describes this. I ended up clicking random choices and rerunning scans because the logic was not obvious.
Next thing I hit: no “scan the whole physical disk” option. It lists one partition and expects you to work with that. On a drive that might be half broken, I wanted to hit the entire thing, not babysit partitions.
The deep scan thing is hidden in a small checkbox. I missed it the first time and only saw it later in some guide. It should be prominent. Without it I got almost nothing useful.
Once I enabled deep scan and let it run, I left my laptop on the desk. It went to sleep. Scan stopped. Recuva did not resume anything. I had to restart the entire thing. That alone wasted a couple of hours.
The bigger problem was file quality. Recuva listed a ton of JPGs and some documents. Many had a green “Excellent” status. I felt hopeful, hit recover, let it write everything to another drive, then started opening them.
About half of the “Excellent” photos were broken. Windows Photos threw errors. IrfanView said unsupported file format. A few half-loaded as gray blocks. Same story with some DOCX files. They “recovered” but Office would not open them.
So yes, the tool found filenames. The actual content on disk was a mess. Recuva did not warn me about that.
After that session I dug around and noticed people mentioning that the software has not had any meaningful update in years. That matched what I saw. It works, but it feels stuck in a specific era, and it does not try too hard to help you avoid bad recoveries.
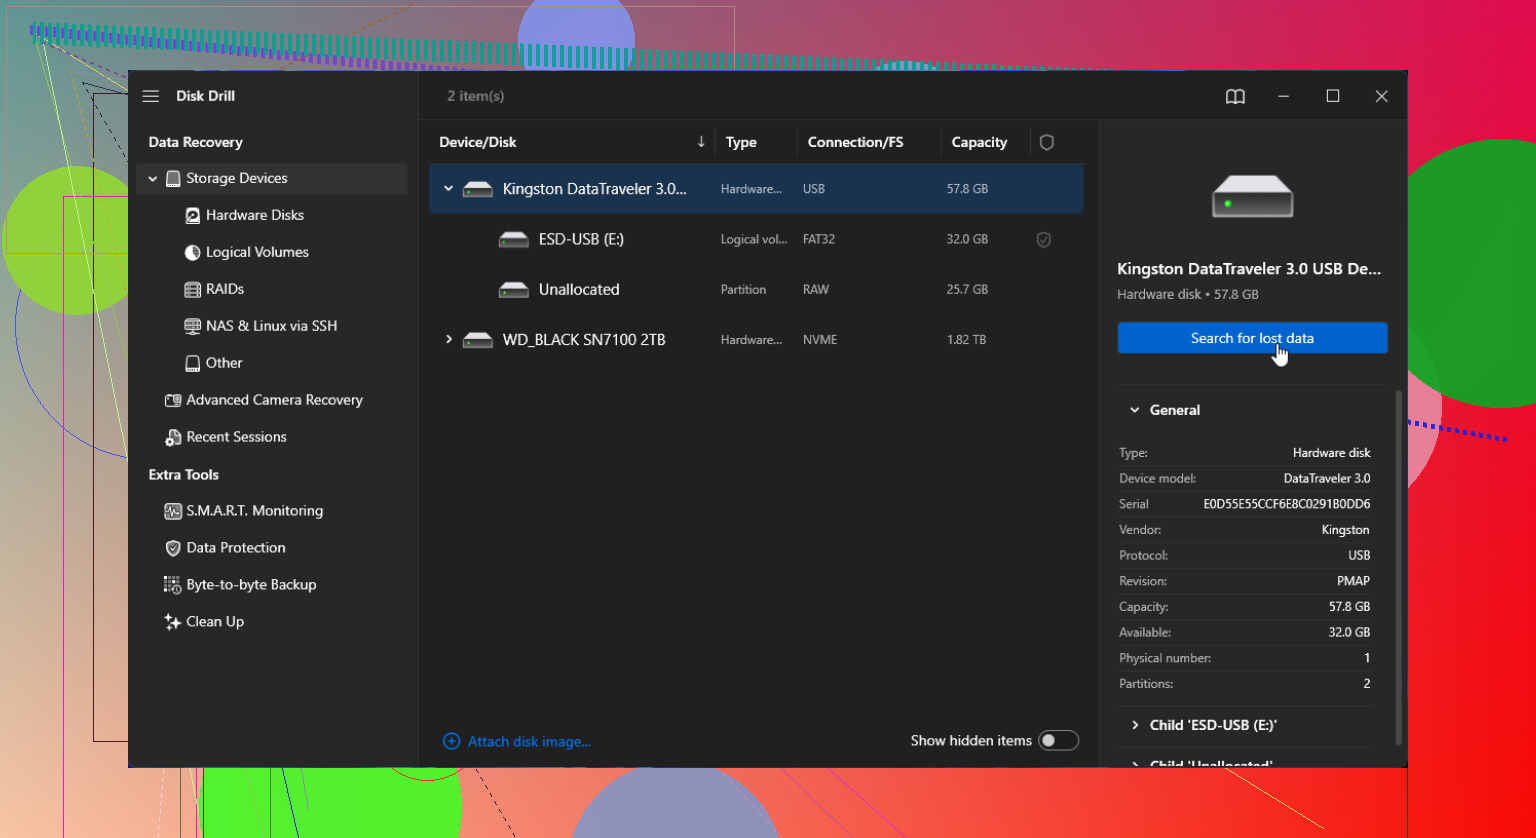
Disk Drill felt like someone still works on it
I installed Disk Drill next, honestly expecting more of the same.
First launch looked cleaner. Modern UI, light and dark options. Drives listed in a way that actually matched how Disk Management shows them. I picked the external disk itself, not just the partition, which is what I wanted from the start.
The main scan button was obvious. I clicked once and it began crawling through the drive. No “where were your files” riddles. I could see files popping up while the scan was still running, grouped by type. That was nice because I did not need to wait for some progress bar to hit 100 percent before checking if anything useful appeared.
Two things made the difference for me:
-
File preview
For photos, videos, and a bunch of docs, there was a little preview pane. I clicked on a JPG and saw the shot before hitting recover. If it was broken, I knew right away and skipped it. For my daughter’s birthday photos, that mattered. I went one by one through the important folders and only marked good ones. -
Recovery probability made sense
Each file had a simple “chance” marker. Stars or wording that lined up with what I saw afterward. Items marked as low chance usually came out broken, which matched expectations. The ones marked as high chance opened fine most of the time. This felt more honest than “Excellent” on Recuva followed by a file that will not open.
The resume behavior was also better. I had to stop a long scan once, closed the app, then came back to it. Disk Drill let me load the session and keep working instead of restarting the entire thing. On a dying drive, that is important, because every extra pass over the surface increases the risk of more bad sectors.
It also pulled files Recuva never showed
One surprise: it found some old RAW photos from a camera that Recuva never listed. Same drive, same partition, same test machine. I compared folder by folder. On Disk Drill they showed up under a generic file type tree with no original names, but the previews worked and I could see the image content.
For documents, Disk Drill gave me both deleted ones and ones from the damaged file system structure. Some came out with generic filenames, but the internal content was intact, which is all I cared about.
Free vs paid reality
Disk Drill’s free version recovered up to a fixed data size. After that, you hit the limit. I burned through the cap quickly while testing and had to decide if I wanted to pull my wallet out or risk more experiments.
At that point I already saw:
- Recuva had higher “Recovered but broken” rate for me
- Disk Drill let me preview photos and Office files before writing them back
- Disk Drill resumed scans and sessions without punishing me for the laptop sleeping
- It handled whole disks, not only partitions, and did not shove me into a wizard every step
Given my use case, losing those birthday photos felt worse than paying for one tool. So I paid.
Things I would do differently next time
If anyone is stuck at the same decision stage, here is what I wish I had done from the start.
-
Stop touching the bad drive
Do not write anything to it. Do not run defrag. Do not format. Every write wipes some chance of recovery. -
If you still want to try Recuva
- Turn on deep scan from the beginning
- Disable sleep on your system while scanning
- Expect to sift through a lot of false “Excellent” hits
- Double check all recovered files before deleting other copies
In my case, Recuva felt fine for something you deleted half an hour ago from a healthy drive. Once corruption entered the picture, it struggled.
-
If you try Disk Drill
- Scan the physical disk, not individual partitions, if the partition table might be damaged
- Use the preview heavily, especially for photos and documents
- Use the session saving to avoid re-runs and extra stress on the hardware
- Prioritize the files that matter to you, not everything it lists
Where I landed
I went in wanting the free solution to work so I did not have to think about licenses. After running both, my takeaway is simple.
Recuva felt fine for quick, low-stakes recoveries on healthy drives. Once things got serious, it felt dated, inaccurate with “chance” labels, and missing basic quality of life features like resume and built-in previews that you can trust.
Disk Drill felt designed for the messier situations. It found more content on the same failing disk, let me verify files before exporting them, and behaved better when a scan got interrupted.
If you have photos of something you cannot redo, like a first birthday, I would not rely on luck and green “Excellent” labels. Spend more time on previewing and testing, even if it means paying for one tool that does less guessing and more confirming.
That is how I ended up with Disk Drill, and it saved more of my stuff than I expected after hearing that click on the drive.
2 Likes
Short version. For important deleted files on Windows, use Disk Drill first. Keep Recuva as a backup option if you refuse to pay.
Here is a straight comparison based on your priorities.
- Recovery success rate
- Disk Drill usually finds more files and more formats.
- It scans the whole physical disk, which helps if partitions are weird or damaged.
- It shows realistic recovery chances plus previews for photos and docs, so you avoid wasting time on junk.
- Recuva works fine on simple cases, like something deleted recently from a healthy drive.
- On damaged or partially overwritten data, Recuva often reports “recovered” files that fail to open.
I agree with @mikeappsreviewer on Disk Drill finding more useful data. I am a bit less harsh on Recuva though. For quick undelete on a still healthy drive, Recuva does the job.
- Safety
- Both are safe enough if you install them to a different drive than the one with the lost files.
- Disk Drill saves scan sessions. Fewer passes over a failing disk means less risk.
- Recuva needs you to re scan if something interrupts, so the drive gets hit again and again.
- With either tool, do not recover files back onto the same drive you are scanning. Use another internal or external disk.
- Ease of use
- Disk Drill has clearer UI, simple main scan button, and better file filtering.
- You preview before recovering, which prevents copying tons of corrupt data.
- Recuva uses a wizard with location questions that often confuse users.
- Deep scan in Recuva is easy to miss, and without it, results are weak.
- Money factor
- Recuva is free, so low risk for a quick test.
- Disk Drill free tier has a data cap. After that, you pay if you want the rest.
- For irreplaceable photos or work files, the cost of Disk Drill is small compared to a pro lab.
- What I would do in your place
- Stop writing anything to the drive where the lost files were.
- Install Disk Drill on another drive.
- Run a scan on the affected disk.
- Use the previews to check your key files first, especially photos, videos, Office docs.
- Recover only the important stuff to a different disk.
- If Disk Drill does not find enough and the data is life or death level, stop DIY and look at a pro recovery service.
- If you do not want to pay yet, run Recuva after Disk Drill, not before, so you do not waste writes on blind attempts.
- On “Disk Drill reviewed”
If you want more detail before deciding, take a look at this in depth Disk Drill review and user feedback. It gives extra context on real world recovery cases, performance on failing drives, and where it beats older tools.
Given your priorities, recovery rate, safety, ease of use, Disk Drill is the better primary tool. Recuva is ok as a free secondary option for simple, low risk recoveries.
Go with Disk Drill first, keep Recuva as your “why not, it’s free” backup option.
I agree with most of what @mikeappsreviewer and @voyageurdubois already said, but I’m a tiny bit less forgiving of Recuva on modern systems. It’s not just “old looking” UI. The whole workflow kind of assumes simple NTFS undeletes and a healthy drive. Once you add:
- emptied Recycle Bin
- partial corruption
- weird partition issues
- or a drive that’s started clicking
Recuva starts feeling like a lottery where half the “wins” are corrupt files.
Where I slightly disagree with them: I actually don’t think Recuva is worth running first in a serious case, even though it’s free. Every full scan is extra wear, and on a borderline drive I’d rather spend those reads on a stronger tool right away. Free is nice, but not if it costs you the last readable sectors.
Given your priorities:
1. Recovery success rate
- Disk Drill: Better on mixed scenarios. Being able to scan the whole physical disk, plus its smarter file carving, usually means more usable results, especially when file names and folders are partially gone.
- Recuva: Decent for “oops I just deleted a file from my SSD” on a healthy system, but gets sketchy when you’re dealing with anything more complex than that.
2. Safety
- Both can be safe if you install them on a separate drive and never recover back to the affected disk.
- Disk Drill’s session saving is not just convenience. It reduces the number of full‑disk passes, which is a safety feature when the drive is iffy.
- Recuva forcing you to rescan from scratch after any interruption is more surface reads, more time, more risk.
3. Ease of use
- Disk Drill: Cleaner interface, more “what you see is what you get.” Previewing before recovery is huge. You can actually confirm that your .jpg or .docx opens before you commit to copying dozens of GB.
- Recuva: The wizard questions are confusing when your files moved through several locations over time. If you pick wrong or forget deep scan, you get misleadingly poor results.
My practical suggestion for your situation (important files, Windows, not just a casual test):
- Stop all writes to the drive with the deleted files.
- Install Disk Drill on another internal drive or a USB SSD.
- Scan the affected disk, not just a single partition if you’re unsure.
- Use previews to cherry pick the irreplaceable stuff first, save it to a different drive.
- If Disk Drill recovers what you need, you’re done.
- If it does not, then try Recuva as a secondary pass, understanding it might give a bunch of “recovered” but broken files.
If you’re wondering about Recuva’s safety in general, there’s a pretty solid discussion here: how safe is Recuva for recovering personal files. It goes into how it behaves with user data, potential risks, and what to watch out for so you do not accidentally overwrite what you are trying to save.
In your specific case, with “bunch of important files” and concern for success rate and safety, Disk Drill is the better primary tool. Recuva is fine for quick, low‑stakes undeletes, but I would not rely on it as my main line of defense when the files actually matter.
Try Windows backups before recovery software.
Open the original folder. Right-click it, select Properties, then Previous Versions. Restore an earlier copy from File History or a restore point.
Also check:
OneDrive Recycle Bin and version history.
Google Drive or Dropbox trash.
Windows Recycle Bin.
Email attachments and shared client folders.
This takes 5 to 10 minutes and avoids scanning the disk. Restore files to another drive first. If no backup exists, stop using the affected disk and use Disk Drill. If the drive clicks or disconnects, dont scan it. Power it off and contact a recovery lab.
Half this thread is answering a harder problem than you actually have. @mikeappsreviewer was dealing with a clicking, disappearing external drive, which is a hardware failure. You said you deleted files from a working Windows PC. Those are not the same situation, and the tool that shines on a dying drive is not automatically the one you need for a plain undelete.
The thing nobody has asked yet: was this on an SSD or a regular hard drive? If those files were on an SSD and it’s your system drive, TRIM has very likely already wiped the deleted data at the controller level. In that case neither Disk Drill nor Recuva will save you, and the more you poke at it the more you’re just confirming bad news. On a spinning HDD your odds are much better because deleted data tends to sit around until something overwrites it.
For a straightforward ‘I deleted stuff on a healthy drive’ case, I’d actually push back on the idea that Recuva is a weak first move. It’s free, it does simple NTFS undeletes fine, and if the files were only deleted recently you may get them back without spending a cent. Turn on deep scan, don’t let the machine sleep mid-scan, recover to a different drive. If that comes up short, then move to Disk Drill and use its previews to check the important files before you trust them. Running it that way costs you nothing to try first and saves the paid tool for when it’s actually needed.
One correction on the ‘scan the physical disk not the partition’ advice floating above. That matters when the partition table is damaged. For files you deleted from a partition that still mounts normally, scanning that partition is fine and faster. Don’t overcomplicate a simple recovery.